

The Ultimate in Servo Mounts
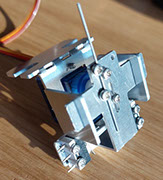
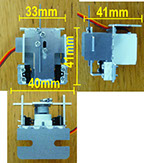
Dingo Servo Micro 10 V2 (B)
The new Micro 10 V2B incorporates many features that have been developed
over the past few years and have been well tested in the Micro 10 mount.
Two improvements have been made following on from customer feedback.
Improvements like: Slotting the switch mounting holes to the edge of the frame
to allow easier fitting of switches and easier removal
for replacement or repairs.
Creating more space between the horn and slider.
Changing the drive screw Ver 2B only
Features Like: Tapped holes for motor mounting, Improved switch operation
Reduced height under the baseboard and simplified
actuator adjustment.
The ability to operate up to 4 microswitches.
(2 switches supplied in kit)
Perfectly linear motion for point operation.
Will fit most 9g servos like PowerHD 1900A, Fitec FS90 or
TowerPro SG90 / MG90
The Micro 10 V2 is a direct replacement for our very popular Micro8 / Micro10
and uses the same drill jig for setting out.
Please Note : Servo motor and control circuitry not included. In the kit.
To contact us:
David Ingoldby
Phone: +44(0) 7754901324
E-mail: dingoservo@gmail.com
www.dingoservo.co.uk
The Micro 10 V2 is an updated version of our flagship Servo Mount
for the operation of points on model railways.
It can throw up to 10mm and as such can be used on most model gauges from O to Z
It is a direct replacement for the Micro8.
Downloads
Product List
Contact Us
Video Links
Price List and
Order info.
As the Micro 10 V2 is a direct replacement for the Micro8, the Micro 8 drill jig can be used to help align fixing holes on this particular mount.
Full instructions for use on the Downloads Page.


The New Micro 10 V2 will also be available in Multipacks.
Trouble shooting.
There have been a few users which have had an issue regarding the lower Actuator pin tightening screw fouling on the motor horn.
It would appear that there are some variations in the sizes of the servo motors and very occasionally this creates the problem.
There are 3 simple fixes.
1. File the offending screw down slightly.
2. Fit a small M2 washer under the screw head.
3. Fit a thin paper washer between the servo motor and the main frame.
Either of these will allow the horn to move freely.
(Thanks to Don Ramsey for the pic)
Note: This has been sorted out by moving the slider by 0.5mm on the new Version 2
A second issue found is that if you are using a large movement on the mount you may need to trim a bit off the horn to prevent it from fouling the wings on the frame.

Note: Multipacks do NOT contain switches, Nut Plates and the M2x10mm screws.